Spanish teachers love to travel. We love sharing our photos from around the world with our students. And we would absolutely love to have our students experience our favorite countries and destinations in person. But that is usually impossible to do, so we have to get creative. With no budget, no airfare, and not even leaving the classroom, how can we travel with our students? I am a huge proponent of interactive virtual field trips. With today’s technology, we can explore the streets of Barcelona, climb Machu Picchu, or even see one of Mérida’s cable car stops high in the mountains of Venezuela all from our classrooms.
I have created a lot of interactive virtual field trips, and you can find them here, but I wanted to share with you my process for creating virtual field trips, too! So keep reading to see how you can create your own interactive virtual field trips!
Step 1: Decide on a destination
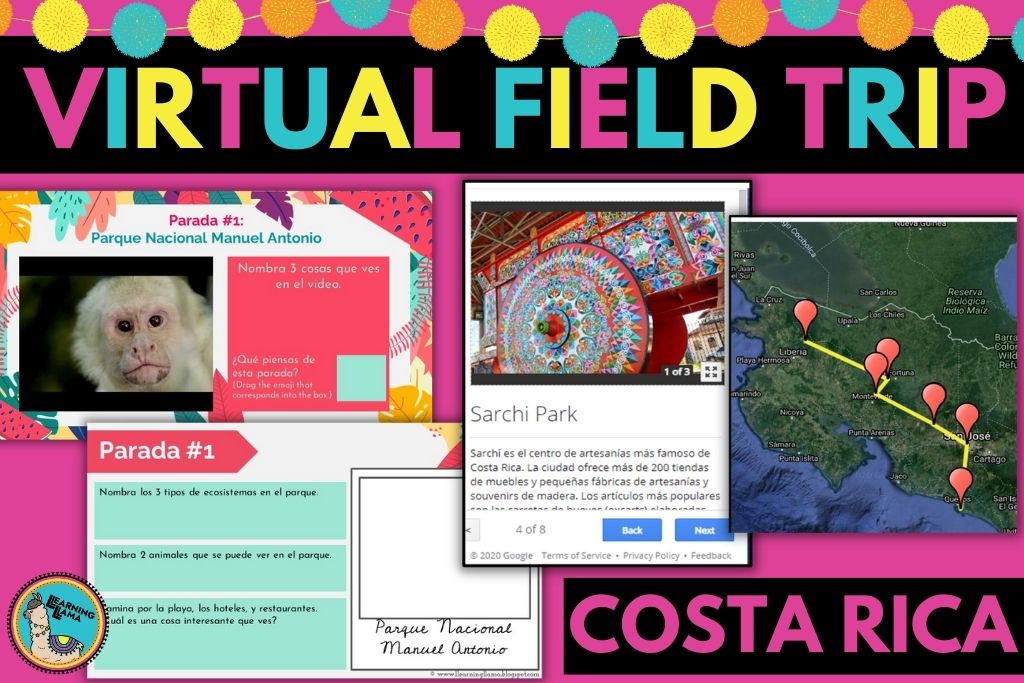
This is the easiest step, as it is with planning any trip! Decide where you want to travel to. Relate the field trip to your current unit or content. Are you teaching about La Guerra Sucia? Then, introduce the unit with a virtual field trip to Argentina before diving deep into the history of the war. Do you have an upcoming unit about endangered animals? Maybe start off with sloths and take a trip to Costa Rica and a sloth sanctuary.
Your destination does not need to be a country. It could be a city, a destination, like Machu Picchu, or even a variety of stops in the Spanish-Speaking world. There are three types of virtual field trips that I like to create. Learn more about each kind here before you build your Google Earth map!
Step 2: Create an itinerary
Once you’ve decided where you want to travel to, you need to come up with an itinerary. I like to make my interactive virtual field trips include at least 5 stops. If you are going to a country, then choose 5 cities or destinations. If you are going to a city, then choose 5 places within that city like a specific restaurant, museum, ruins, etc.
Creating the itinerary is easy if you’ve been to the country before. I based my Peru and Costa Rica virtual field trips off of my actual travel experience. However, when I was designing trips to Chile or Mexico, I had only my knowledge of the country from teaching Spanish. I wasn’t sure what the highlights should be, so I researched travel itineraries from websites like EF Tours. When I was in high school, we used EF tours for our Spanish Club trip to Costa Rica. Their website has such a variety of itineraries that you can use for inspiration. I also try to do a quick google search for “top destinations in (name of country)” or “5 days in (name of country)”, which yield some great results, too.
Try to pick destinations that all of your students will find enjoyable. For example, the stops on the Madrid, Spain field trip include a soccer stadium, flamenco dance theatre, a market, and more. I tried to make a variety of stops so that each student would take interest in at least one stop!
Step 3: Create a Google Earth Trip
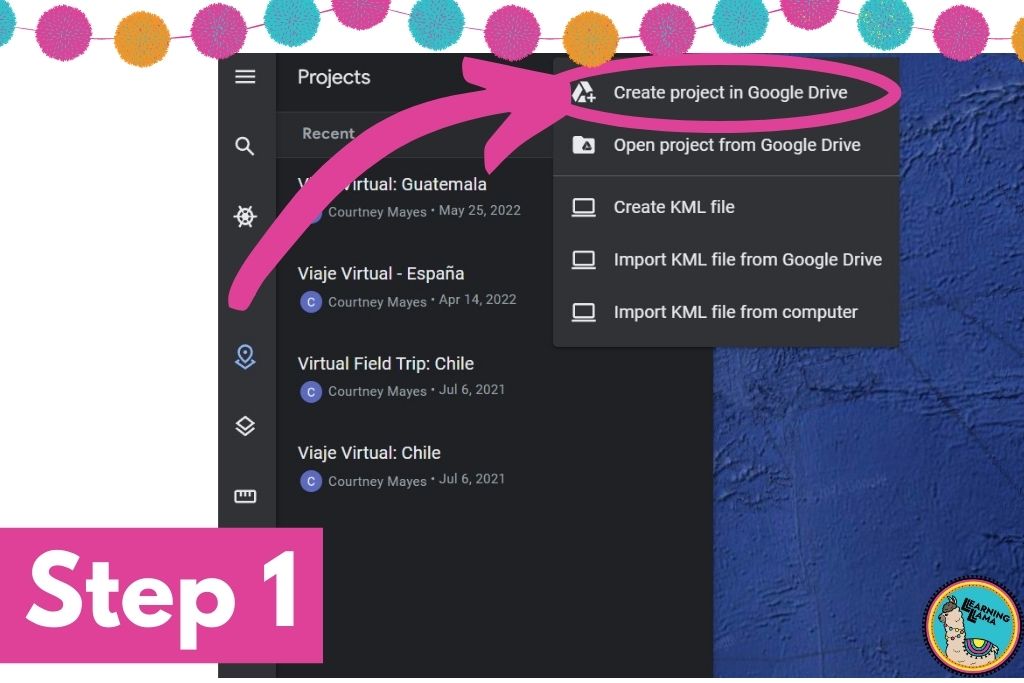
1. Create the Project
Now that you have your stops on the itinerary, you are ready to create the Google Earth tour. Once you go to Google Earth, you will click the button on the left hand side called “Projects.” At the top, click the blue button “New Project.” Then, you can either create the project and save it to your Google Drive or your computer (KML file). I use Google for pretty much everything, and since this is a Google product, I like to just create it in Google Drive.
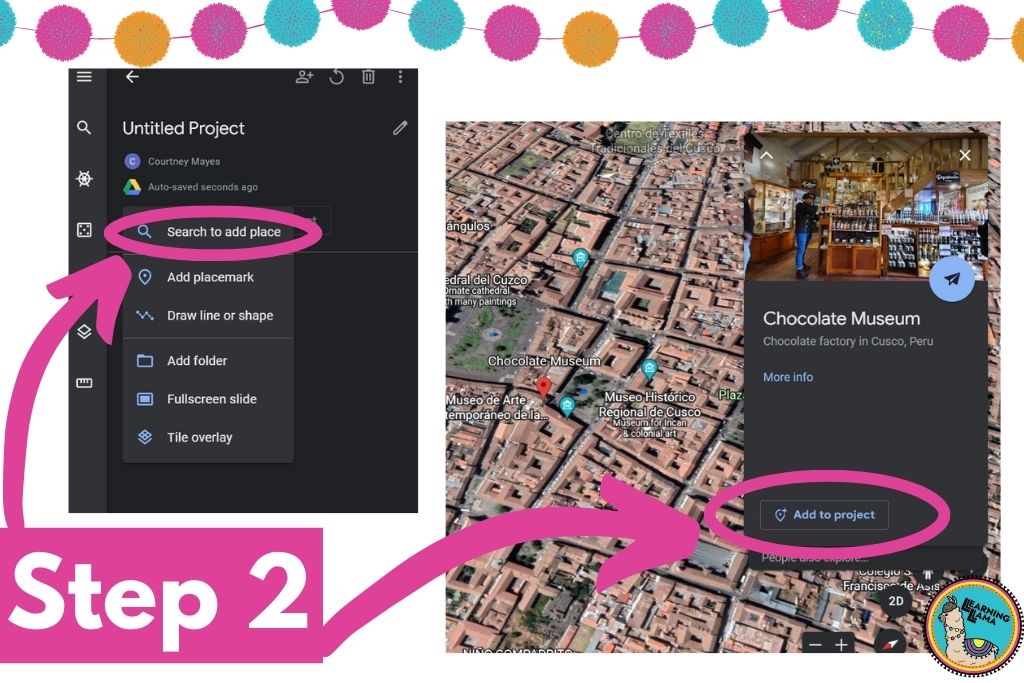
2. Add Features
Once your project is created, you will be able to edit the name and add “features” or the stops on the itinerary. I think the easiest thing to do is search to add places. Type in the name of the city or attraction and then click on the appropriate selection. Google Earth will show you the location on the map, and you just click “add to project.”
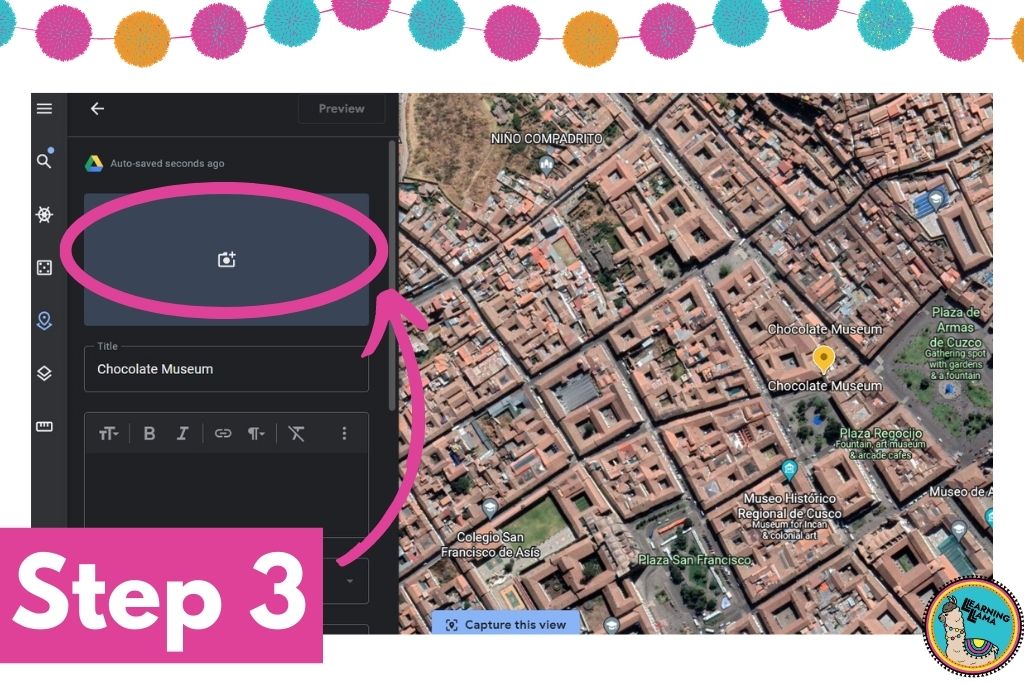
3. Add images
These next two steps are optional. I like to include a short description of each stop in the target language for my students. Google may provide a sample description, but I think it is best to write something related to your current topic of study and make it comprehensible for your students. You can also add images of the destination by clicking the blank photo button. This allows you to either upload your own images or find them right on Google. I recommend including a variety of images of the stop. For example, if I was showing Machu Picchu, I would show pictures of different parts of the ruins and maybe even a historical image.
4. Add Text in the Target Language
Then, beneath the images, there is a text box for you to write a description about the stop. Everything autosaves with Google, so when you’re done, just click the back arrow and you can repeat all of these steps for the next stop on your trip.
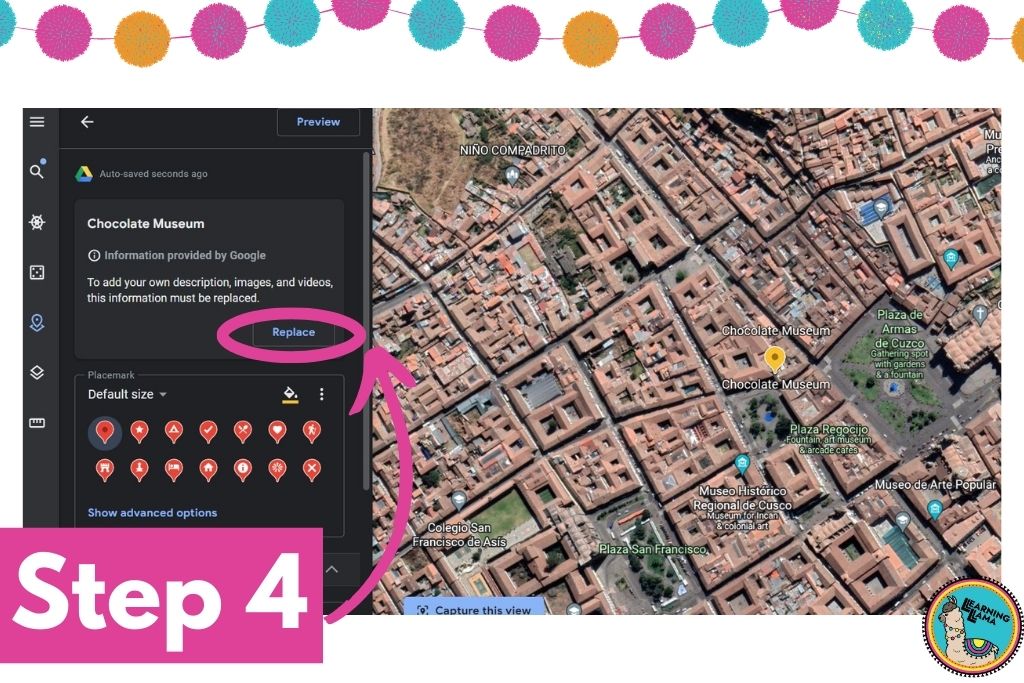
Step 4: Create a Google Slides
You could stop right there and just share the Google Earth tour with your students. They will explore the map on their own, but how will you hold them accountable? I create a Google Slides that accompanies my interactive virtual field trips. Since this field trip is completely virtual, it is easiest to have your students gather their findings digitally as well.
For each stop on the trip, I have one or two slides in the presentation. First, I ask them to tell me what they see at this stop. They must jump into the map and explore it (see instructions below). Then, they identify 3-5 objects or interesting things that they see. I even make them take a screenshot and add it to the slide so I know they were there.
The second slide is for them to answer questions about the stop. This could be in the form of a scavenger hunt where you ask them to find specific things in the map. For example: Name a restaurant in the plaza or how many parks are in the city? Or the questions could come directly from the description you wrote about each stop in Step 3.
Here are some sample slides from a virtual field trip to poinsettia greenhouses in Mexico. I had students complete some preliminary activities by watching videos and reading an infographic. Then, you can see where they uploaded the screenshots of their exploration of Google Earth.

How do students explore a Google Earth Virtual Field Trip?
In the bottom right hand corner of the map, you will notice four buttons around the globe. The button with the person figure allows students to jump into the map and explore with 360 views. They will click the figure and drag it onto the map.
Blue Lines on the Map
Blue lines are the streets and roads on the map. If you drag the figure onto blue lines, you will be able to walk around the city or destination, as if you were walking through the streets. You drop the pin at any point on the blue line and then you can maneuver through the stop without exiting street view. There are white arrows that appear and if you click those, Google automatically moves you along the street.
Blue Dots on the Map
Blue dots are still images (360 degrees) that tourists have taken and uploaded to Google. You can still spin around and view a 360 shot of the location, but you will not be able to walk any further than the spot you are “standing in.”
I encourage my students to jump into both lines and dots because they will get different views. When they want to exit the current view, click the back arrow on the top left of the map and they can repeat the same steps.
I hope this helps you design some interactive virtual field trips for your students or you can choose from my pre-made trips here. You’ll find trips to Chile, Peru, Mexico, Spain, and more!
You can also accompany these field trips with lessons on geography. I’ve compiled a list of games and activities to teach about Spanish-speaking countries here.